Wednesday, 20 September 2017

Birthday Crowns - Let's call it a tutorial

Both my girls had their birthdays not too long ago. We celebrated Rebecca's first birthday at the end of July, and Helena turned five last Saturday. Helena insisted that I make birthday crowns for the both of them because "that's how we do it in kindergarten".

In kindergarten they just cut them out of cardstock and staple the ends together. According to my daughter, they never really fit and are uncomfortable to wear - plus, sometimes hair gets caught in the staples (even though they make sure the "bad ends" are on the outside). Could I make her one that's more comfortable and better fitting... well, challenge accepted.

This is what I came up with:


Materials I used:

  • corrugated cardstock (min. 7 inch x 5 1/4 inch)
  • adhesive plastic rhinestones, stickers, etc. for decorating
  • 10 inch x 2 inch piece of scrap fabric
  • 6 1/2 inch piece of elastic
  • sewing thread
  • crochet thread
  • sewing machine
  • needle


First of all, I drafted a template of half the crown (you can find it in pdf format here). Just cut it out and trace it on some corrugated cardstock.


To avoid the feeling of the crown sticking to the forehead and make it more comfortable to wear, glue some cotton bias tape to the bottom edge on the inside of the crown after cutting it out.


Gather supplies to decorate the crown.


My daughter loves sparkly, glittery things, so I went with lots of adhesive plastic rhinestones - white and turquoise for the most part, because she wanted a Frozen themed party.


Cut a 10 inch x 2 inch rectangle of fabric and a 6 1/2 inch piece of elastic for the strap.


Fold the fabric rectangle lengthwise (wrong side out) and sew along the long edge. Then turn it right side out.


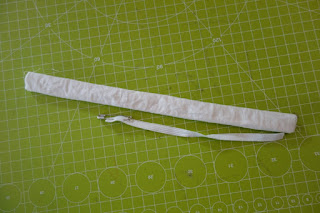
Attach a safety pin to the elastic and thread it through the fabric tube. Pin the ends of the elastic to the ends of the tube and sew them shut.


Last step! Hand stitch the elastic strap to the ends of the cardstock crown with just a couple of stitches (I used crochet thread):


And done!


Sunday, 10 September 2017

Fun with Tea

Earlier this year a class prompt came up at the Harry Potter Knitting and Crochet House Cup that asked for tea related projects. It inspired me to conduct a little bit of an experiment that I want to share here, even though it's been a while. I did not have a lot of experience with plant dyes yet, but I was aware that the treatment of the wool prior to and after dyeing can have tremendous influence on the resulting colour. So I decided to find out how this applies to black tea.

I reskeined some undyed wool into small skeins à 25 g and gathered my supplies - I would be limited to five attempts by the number of yogurt jars I own (I should really start buying yogurt in jars again):


Then I prepared the mini-skeins for dyeing.

#1, #4 and #5 : just water

#2 : water with 5g alum

#3 : water with 5g alum and 2 g cream of tartar

So no mordant in jars #1, #4 and #5? No. Since black tea contains tannins that act as a mordant you don't HAVE to pre-mordant your wool. But it might have an interesting effect to do so anyway... But let's come back to this later... I put all the jars in the oven at 90°C for about 2 hours, then let the wool cool down in the jars over night.


The next morning I prepared some really strong black tea - 72 tea bags (126 g) of a Ceylon / Assam blend on 2.2 l of water. Wouldn't recommend to drink that...


I let that concoction cool down to almost room temperature before I took out the tea bags (giving them a good sqeeze to make sure I did not loose too much of my dye). Then I combined what was left (1.8 litres) in one bowl and added 200 ml of water to come back to a full 2 litres (I would need 400 ml per jar).
Then (it was afternoon by now) I got the wool out of the jars, rinsed the skeins treated with alum / alum + CoT and gave each skein a good spin in my new salad spinner before placing it back into its jar. I filled the jars with dye to cover the wool…


…and put all 5 jars in the oven again at 90°C. When I came back from the playground about 2 hours later I switched of the oven, but kept the jars in for another hour before I took them out and placed them on the balcony to cool down.
Samples #1, #2 and #3 would receive no further treatment besides rinsing. And there already seemed to be a visible difference in the colours of those dye baths!


When the wool had cooled down enough later that night, the wool in jars #4 and #5 should receive their respective special treatment. I removed the wool from the dye baths and gave it a bit of a squeeze, but did NOT rinse it. I poured out the dye and prepared:
#4: a solution of a pinch of potassium carbonate in 400 ml of water.

#5: a solution of ferrous sulfate in 400 ml of water. My research indicated not to use more than 2% of the weight of the fibre treated - in this case 0.5 g. I went with a tiny pinch of the stuff because my kitchen scales do not measure such tiny amounts (precision scales are the next item on my shopping list…). I replaced the skeins… and the effect was breathtaking! The contents of jar # 5 (on the left) turned pitch black!


Again, heat treatment, this time for just about an hour. Then lots of rinsing.
Thanks to the salad spinner the yarn took just a day to dry. And here’s the result:
Just as a reminder:
#1: no mordants whatsover
#2: pre-mordanted with alum
#3: pre-mordanted with alum + cream of tartar
#4: not pre-mordanted, treated with potassium carbonate after dyeing
#5: not pre-mordanted, treated with ferrous sulfate after dyeing

Every single sample came out a different shade of brown - although the differences between #1, #4, #2 and #3 may be subtle and hard to capture with a camera. In real life #1 has a visible orange tinge that is not as present in #4. Equally, #3 has a slight reddish tinge that is not as visible in #2.

Another interesting observation that I had read about and that I can confirm is that #2 feels less soft than the other skeins (hot alum mordanting has that effect - which can be avoided by adding cream of tartar - but as we can see, this can also cause a different outcome in colour).

The most visible and most stunning result, though, is the colour produced by after mordanting with ferrous sulfate. That dark (rather “cold”) brown just stands out against all the other - rather warm - shades of lighter brown I got.

So do I have plans for my tea dyed wool? Yes! In fact I do: I want to make a naalbound hat - with stripes! Hopefully some day soon...

Saturday, 9 September 2017

A Kiwi to dye for...

So I got myself a spinning wheel.


I loved drop spindling (I still do in fact!), but at one point I felt the need for speed... We became friends quickly, and now we'll celebrate our second anniversary in November. We started out spinning our way through fibre samples, and eventually came to the point where we dared tackle pretty braids like this one (Malabrigo Nube - Posión)...


... which we transformed into this yarn, that is still waiting to be knit up. This was the first time I intentionally used the method known as "fractal spinning".


Soon after I got my Kiwi I also felt the urge to dye fibre braids (and, to a slighlty lesser degree, yarns). So far, I've tried Easter egg dyes, Kool Aid and plant dyes. I have kettle dyed and hand painted both fibre braids and skeins of yarn, I have even tried ice dyeing. Oh, let me just show you the ice dyeing result, since I've spun that up already.

So this was the result of my first attempt at ice dyeing. I used several colours of KoolAid for this colourful braid.


I learned a lot from that experiment, and will have to try again with some improvements to the dyeing process, but well, not too bad for a first try. When the time came to make yarn, I decided that this spotty braid called for another session of fractal spinning, and I think this pretty skein proves me right:


That tiny skein in the front were the leftovers I quickly n-plied because I didn't want to waist a single yard...

I must admit that little Kiwi did not get quite the attention I would love to give him lately, due to the fact that there is now a rampaging toddler in the house, but I feel our time will come again soon. I can't wait to spin up the pretty braids that are waiting in my fibre stash. In the meanwhile, I have been using my spindles again more often - I love taking them out to the playground when I watch my girls play and / or sleep. I am almost garantueed to attract at least a couple of kids who are eager to find out what it is I am doing (some kind of witchcraft for sure...). I am always happy to educate them ;).

Oh, and I have even had a try at making my own spindles out of chopsticks and polymer clay.


And you know what? I used them to spin the finest yarn I've ever spun! I love them, and want to make more!


Oh well, that's it for today... little one will wake up soon.


Friday, 8 September 2017

Uh oh...

... has it really been almost three years? I never intended to take such a long break from blogging about my crafty endeavours, but then I guess work life got the better of me. Anyway, I'm back! Hello again!

So, what's new?

Most importantly, my family has grown a tiny bit. My second daughter, Rebecca, was born July 31st, 2016. It's hard to believe she's already celebrated her first birthday.

But this this actually not a blog about my private life, is it? So, back to crafty topics...

I got myself a new sewing machine... uhm... two years ago, I think? Best decision ever to get rid of that old thing that made me think twice before I started sewing late at night, for fear I might wake my daughter or even the neighbours. Seriously - it sounded like a demolition hammer rather than what I thought a sewing machine should sound like. Plus, it wouldn't sew through more than two or three thin layers of cotton fabric without constantly getting stuck. So, I bought a Husqvarna Viking - and haven't regretted it even once. It's making such a huge difference! I dare tackle much more elaborate projects now. I still love making project bags, but the limits of what is possible for me to make have been pushed waaay out.

My favourite sewing project so far this year was a costume I made for Helena (who is almost five years old now!). She (like almost all girls that age I guess), just loves everything Frozen. She hasn't even seen more than half of the film, BUT... everything has to be about Elsa and Anna and the rest of the lot. So, no big surprise - she asked me could I make her an Anna or Elsa dress in time for the carnival party at kindergarten. I went with Anna's outdoor winter wear. I followed the Simplicity Pattern for the dress and cloak, and found a pattern for the cap somewhere on the internet (if I come across it again, I'll edit in the link).

I loved making the dress, and I think it came out beautifully.


My daughter was absolutely thrilled - here you see her fully dressed up.


So, I'll stop here for now... there'll be more news later (and also things that are really not new...), but chores are waiting...